Prestashop-thirtybees shipping carriers is an integral and crucial part of your ecommerce website! It is going to be a vital turning point for your e-commerce website especially this up-coming holidays.
Every country uses or have its own shipping parcel that users and customers prefer. But for the sake of this tutorial, we are gonna be focusing on working with the Prestashop-thirtybees shipping carriers module we have available for us on Prestashop-thirtybees ecommerce system. We are just going to leave the countries behind and learn how the shipping module is being set up from the admin console of your Prestahop-thirtybees ecommerce website.
The Prestashop-thirtybees shipping carriers module
You can basically create you own shipping table and offer different shipping options for your customers and users. For example, you can offer a a faster delivery alternative to a standard (eg in express) one, depending on how you set your shipping options. Some of the customers agree to pay more for a shorter delivery time. There is also the option of offering a one-day shipping or ship on the same day option. Buyers look very closely at shipping costs, so try to be as fair as possible.
There are plenty of choices you can create from the backend of your store with Prestashop and thirtybees ecommerce.
Let’s dive in to learning Prestashop-thirtybees shipping carriers module!
In this tutorial we are going to explore the following:
- Creating a Shipping Carrier
- Creating shipping costs
- Adding size, weight and group access
- Remove and enabling handling charges from carrier preferences.
To start, you need to log in to the back end office of your Prestashop or thirtybees install. Once logged in, hover and click on the “Shipping” menu at the right side of the admin page!
You will usually find two Prestashop-thirtybees shipping carriers options. This is automatically generated by Prestashop or thirtybees at installation. One is the default carrier and the other is create at installation and takes in the name of your ecommerce store.
Click on the one having the name of your store, mine is “assas”, yours would be different of course – and click “delete”.

Like so!
Editing the default “My Carrier” shipping option
Now click on the “My Carrier”. We are going to edit it to suit our shipping options offer.
Enter a good Carrier name like “Standard Table Rate“. Give a “Transit time”. Transit time is the time/days by which you determine the shipping time for the product to be delivered. Usually 3-8 days would do for a standard shipping.
Speed grade pertains to the speed by which this particular shipping options is. “0” for the longest, “9” for the shortest. Let’s leave it at “0”. We will not upload a logo for this one, but you can play around and upload your own logo if you want. We will leave the tracking url empty too! Just like that!

Creating the shipping costs for “Standard Table Rate” shipping option.
To do so, just click on the tab “Shipping locations and cost” or click the “Next” button at the bottom right of the page.
Here you will have the option to “Add handling costs” – set it at the end of the process. If you are offering FREE shipping, set to “YES” too. You have the option to set your free shipping according to Price or Weight. For this article, let us set it to “according to Price“.
Set you Tax. Usually at 12%. Prestahop and thirtybees comes in with a default 12% tax.
If the total price or weight is out of range, you can set the default “according to the highest total” or to “disable the carrier”. Like so.

Setting the price range
Now, let us set the price range for your Prestashop-thirtybees shipping carriers option “Standard Table Rate“. The rates will be applied when the total purchase reaches some amount, usually at “1” amount. And the FREE shipping will take effect when the total amount purchased is greater than let say, “225” dollars. Or what every you set it to be.
Check the zones you want this Ranges to be applied to.
To Add new range, click on the “Add new range” and make your ranges as you see fit. Check the screenshot below to see what I have done. the numbers are complete out of nowhere, you can enter whatever number you want as long as it is reasonable to your customers.

Alright! We are half-way there!
Now let’s add size, weight and group access.
Adding size, weight and group access is easy. Just click on the tab that says “Sizes, weights, and group access“, then enter the values you want. And that is it!
Set the Maximum package width, if not leave it as is for unlimited width. So too the “maximum package height”, again leave it at 0 for unlimited height. Set the “maximum package depth” and the “Maximum package weight”. Again, leave it at 0 for unlimited.
You can set the group access. The default is set to access all! If you want that this shipping carrier only be available for logged in customers, uncheck the “Visitor” and “Guest“. If not, leave it as is.

Once done, click “Summary” to see the summary of your shipping carrier option “Standard Table Rate”.
Checking your Prestashop-thirtybees shipping carriers option summary page
It should give you the following details.

If all details is what you want it to be, Click “Finish” to save your work. The Standard Table Rate shipping option should look like the screenshot below:

Awesomeness!! 🙂
Setting up the handling fees
Now, there is one more thing we need to get done before we bag this whole thing up – that is the Handling fees. If your product require you to have handling fees, then let’s get it done. To do so, hover on the “Shipping” menu, then click on “Preferences”.
You should see the screen like below. We are going to set the handling chargers, set the start of FREE shipping. For this tutorial, let us set it to $225, because that is what we set in the “Ranges” when we set the shipping options up and the total weight to 10 kilograms. Rightly so. You can set whatever values you want in here, but it has to be the same one that you entered in in the “Carriers”.
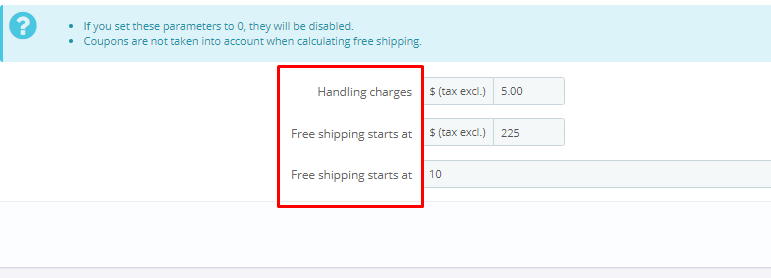
Click “Save” button at the bottom right side of the page to save your work!
At this point we are basically done with this tutorial, Learning Prestashop-thirtybees shipping carriers.
So you have now set up a basic Table rate shipping defining you ecommerce website shipping options based on the total purchased price. Having a good shipping carrier options adds assurance to customers to make sure your website is not losing sales.
Way to go!! That was not too bad? Wasn’t it?
Let us know your comment regarding this tutorial in the comment fields provided below. And dont forget to share this on social media.