A blog module for prestashop-thirtybees ecommerce is one of the most requested features by website owners with the continued popularity of blogging. And today, we are gonna be talking about this compact but powerful blog addon for prestashop-thirtybees system.
A blog modules is an excellent feature to accompany your ecommerce website, and there is no denying that blogging improve ecommerce SEO considerably as long as fresh contents are consistently added! This blog module is absolutely free, courtesy of thirtybees team developers.
They promised to have this essential addon built and have it as a native module for thirtybees installs, and they delivered on that promise. Here is what they have to say:
As promised on our roadmap we wanted to provide you with a blog module as soon as possible. Unfortunately we couldn’t make the module for version 1.0.0 of thirty bees, but users of version 1.0.1 and above can now directly install the module from their back office.
The Blog module basically features the same functionality you would expect from a blogging platform:
- Create contents for your blog
- Keep post contents in categories
- Add ability for readers to comment (through disqus login)
- Add images and other media
- Clean URLs!
- Set publish date
- It comes with widgets to show recent and popular posts and your blog categories (visit “Modules and Services > Positions”)
Setting up the blog module for prestashop-thirtybees ecommerce
Once again, login to your prestashop-thirtybees backoffice, and go to Modules and services. Type the word Blog in the search field, like so.

Click the install button to install the module. After installing the module, the first thing you see is the configuration page.
Here are the basics configuration of the blog module. Let’s go through the options one by one.

- Meta title – the title of your blog. Example, Powertools Blog, or Baby’s toys
- Blog. Keep the title short as possible without sacrificing the theme of your blog.
- Meta description – Should describe what your products are all about or your ecommerce website is selling. Spend a little bit of time to construct your blog description.
- Blog url key – this will be the base URL of your blog, e.g.: https://example.com/en/blog. For usefulness purposes, blog will do.
- Number of posts per page – The number of posts to show on e.g. a category page
- Show author name – Author names will be hidden if this is disabled
- Show dates – Show published dates
- Post count – show how many views a post has
- Social media button – Show buttons to share the module
- Author name style – First Name, Last Name or Last Name, First Name
- Show category image – Show the current category image at the top of the current category page
- Lastly, if you have a disqus username, scroll to the bottom of the page, unlock the comment section by adding your username in the space provided. If you do not have a disqus account, register over at disqus.com for a free one, then come back and add it.
Adding your first website blog category
To add your first blog category, click on the Blog menu near the bottom on the left column, then click Categories. Adding a category is necessary before you can start adding you post contents.

Adding the first post
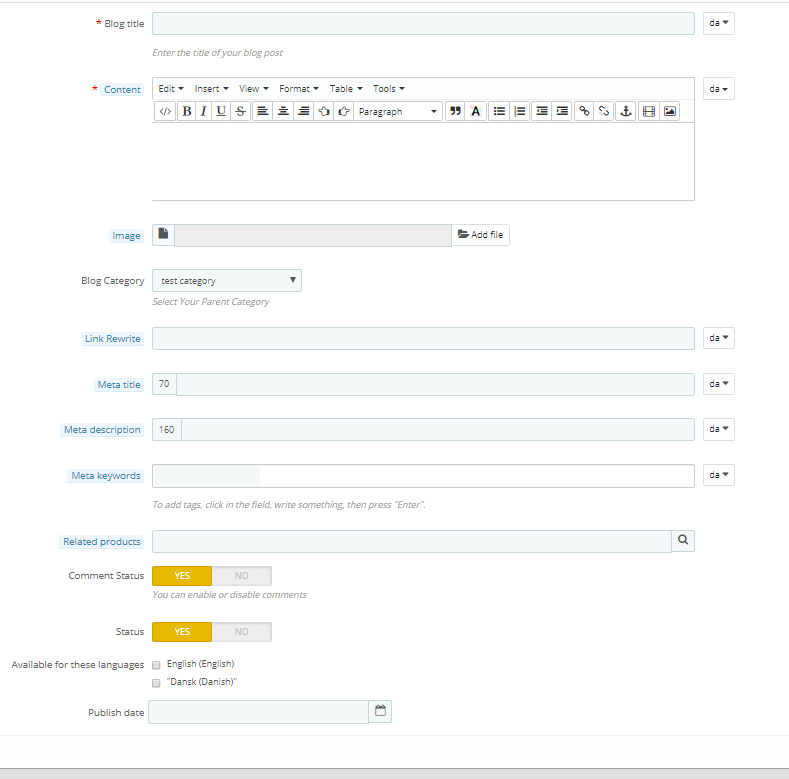
Hover on the Blog menu, and click Posts to add your first post. The following are the settings available for you.

- Blog title – The title of your post
- Content – Your post’s content
- Image – Set an header image (shown on both the blog post page and the category page)
- Blog category – Parent category of the blog post
- Link rewrite – the URL key of the blog post
- Comment status – Should comments be shown?
- Status – Is the blog post enabled?
- Available for these language – You can choose to hide the blog post for several languages
- Publish date – Choose a date for publication

Don’t forget to click Save to save your work!
Adding a Blog menu item on the top menu
After you have gone through all these steps your blog will be available on the URL you have chosen. The blog is not automatically added to the top menu. If you want to link to your blog you can add the link manually.
To add the link, go to Modules and Services then search for blocktopmenu module. Scroll down to the bottom till you see “Add New Link”, like so.

Save your work then go to the front page and refresh the page. You should be able to see your menu something like this screenshot.

Displaying your blog module on the left column to give it more exposure
You can hook these widgets onto your page’s columns on the back office page “Modules and Services > Positions”.
In conclusion
Blogging boost ecommerce SEO for five main reasons:
- You blog provide fresh and consistent content that Google loves
- Blogging is an excellent way to optimize the keywords you want to rank for in searches
- It allows you to develop and strengthen your relationships with new and old customers through social media
- Blogging allows you to build your links from other high quality websites because you have valuable fresh content.
- Your blog connects people and potential customers to your brand
Click this link to download the blog module for prestashop-thritybees ecoomerce.
Check out this 13 easy ecommerce SEO tips to generate more traffic to your shop
If you are looking to speed up your prestashop-thirtybees ecommerce website to a page load speed of less the a second, do it with Cache-API module for prestashop-thirtybees.
All of our ecommerce resource are absolutely free.


